PhotoFiltre: Lightest image editor
 Commercial software like Photoshop comes with an exhaustive list of features that is ideal for professional graphic designers. Here, we’re looking at PhotoFiltre, which, is in comparison, a tiny and free image editor. However, it’s something that you’ll find useful for everyday use — crop photos, make wallpapers or do simple artwork.
A walk through the usual features
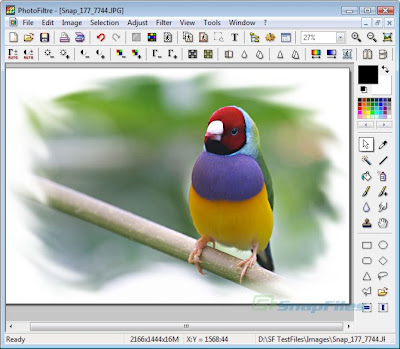
The software layout is quite simple — the main toolbar is located to the right and the image properties toolbar on the top. You can access the effects in the Adjust and Filter menu. You can adjust the image and canvas size, and the image properties using the Image menu. Overall, PhotoFiltre is similar to Photoshop itself, so getting around the interface shouldn’t be a problem.
1. Adding files to PhotoFiltre
Loading files is a straight-forward process in PhotoFiltre, as in any other image editor. However, there is another way to do this. A feature called Image Explorer lets you view images in an entire folder including subfolders. You can access this feature by clicking on clicking on Tools > Image Explorer. A pane will appear at the bottom of the screen. Right-click on it and go to Explore > A folder. Select a folder and click OK. You can open images shown here by double-clicking on them.
2. Colour selection tool
The colour selection tool in PhotoFiltre has a few different modes which can be accessed by clicking on the left and right buttons below the colour selection tool. This presents a more accurate way of selecting colours.
3. Saving, loading and positioning shapes
Every good image editor has shape tools with presets, and PhotoFiltre is no exception. Simple shape presets can be selected from the toolbar on the right. The polygon and lasso tool can be used used to create your own paths. With PhotoFiltre, you can also save these shapes, for future use. To save these shapes, click on the Selection menu and then on Save shape. Give it a name and click Save. To load, click on Load shape item in the same menu. You can also move this shape accurately to the centre or to any other point on the image by clicking on Selection > Manual Settings. Size of the shape can also be changed from the same dialog box.
4. The PhotoMasque feature
The PhotoMasque feature allows you to set a mask for your entire image. The feature can be used by clicking on Filter > PhotoMasque. Here you can load a mask file and a list of supplied masks will be present. Select the mask you want, and click Open. You can choose the effect you want to get, by using the mask. To do this, click on the Mode dropdown menu. You can select the intensity of the effect you want, and the mask can also be inverted. Click Preview to see if you like the results, then click OK.
5. Batch processing in PhotoFiltre
The batch processing feature allows you to process multiple photos or images in one go, instead of opening every single image and processing it. Click on Tools > Automate / Batch to start it. First, select the photos that you want to process, by selecting the source folder and then the output folder where the processed images need to be saved. The other tabs can be accessed to set parameters and effects that you need for the images.
6. Reading EXIF info
Each image you capture using a digital camera, has pieces of information stored on it. This includes information about the camera and the photo taken. You can read this information by clicking on Image Properties under the File menu. Click on the EXIF button. You can export this information to a text file by clicking on the Export button.
7. Creating an icon
PhotoFiltre has a convenient feature that lets you create icons for Windows, without having to manually set colour depths and sizes. First, open the image or create one that you want made into an icon. Simply click on Tools > Export as icon to create your icon. The ICO file can be used with any application.


 TechQuark is a mobile-friendly website. Simply bookmark