
How to Update MX Records to Office 365?
Mail Exchanger (MX) is a kind of DNS (Domain Name System) record that routes the emails to a specific mail server. MX records comprise information about the mail server’s domain name that will manage the incoming emails for the domain.

When migrating from a local Exchange Server to Office 365, to start receiving emails on the new system on the cloud, you need to also change the MX records in the domain registrar from the local Exchange Server IP address to the cloud CNAME provided by Microsoft. In this article, we will see how to update the MX records to Office 365.
Process to Update MS Records to Office 365
Here’s the step-by-step process to point the MX records to Office 365.
Get the MX Records Details
MX record is not an IP address for Office 365. This needs to be given from Microsoft in a form of a CNAME record request. So, you need to first get the details of MX records. Here’s how:
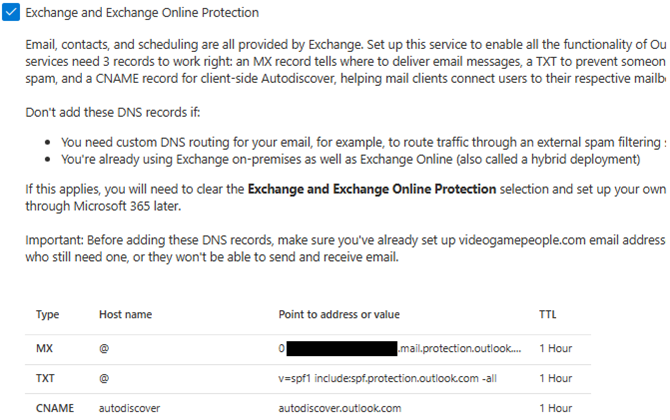
Note: First, add and verify the domain in the Exchange Online.
- Open the Microsoft 365 Admin Center.
- Expand Settings and then click on Domains.
- Find the domain and click on DNS records. You will see that the status of the domain is still in Incomplete setup.
- Click on the domain and click on Continue setup.
- Click Continue. You will see all the records you need to apply the registration of Teams, mobile device management, and DomainKeys Identified Mail (DKIM).
- Take note of the three records needed for Exchange mail flow and Exchange Online protection. Though the MX record alone will allow you to send and receive emails, you need to add the other two records for online protection.
- The MX record would be of priority 0. The value will be <name of the registered name>.mail.protection.outlook.com.


Change the MX Record
Depending on the domain DNS hosting company or your locally hosted DNS, the MX record can be changed from the registrar. Here, we will take into consideration that the DNS is hosted locally.
Open the DNS Manager from the server and then find the Zone hosting your DNS records.
Before proceeding, make sure you have an export or a backup of the DNS server.

Double click on the MX record.
Change the Fully Qualified Domain Name (FQDN) of mail server to the one you’ve noted above (from the MX record in the Microsoft 365 admin portal). When this is done, change the Mail server priority to 0.

Note: If there are any other MX records, make sure to clean those records as these are not needed anymore, especially if there is one already with priority 0.
Once the changes are done, click on OK.
You can see that locally the DNS points correctly. However, when you change a domain DNS record, it may take up to 24 hours for the changes to propagate over the internet.
Considerations and Best Practices
It is important to always take a backup of the zone. This will come in handy if something happens or a record is removed by mistake. Ensure to make such important changes in a maintenance window or ideally on a weekend. It’s important to have all the mailboxes ready with all the distribution groups, Office 365 groups, and public folders to make sure that no email is lost. Make sure the aliases are assigned correctly with the users’ respective licenses.
Conclusion
There are various steps involved when it comes to migration from local Exchange Server to Office 365. One of the important steps is to update or change the MX records to Office 365 so that you can receive incoming emails to and from the Exchange Online service. Above, we have discussed how to change the MX records of the domain from the local Exchange Server to Exchange Online (Office 365).
Another important step is to ensure smooth migration of mailboxes and other data from local Exchange Server to Office 365, with minimal impact and no loss of emails. For smooth and quick migration of data, you can take the help of a third-party EDB to PST converter tool, like Stellar Converter for EDB. With this tool, you can open any version of Exchange Server database (EDB) file - from 5.5 to the latest version 2019. After opening the EDB file, you can browse through the data store and export the mailboxes and other data directly to Office 365. You can also save the mailboxes in PST and other file formats. You can also be able to export the EDB data directly to a live Exchange Server database of any version. This tool allows granular export of data pre and post migration with ease and reassurance.


 TechQuark is a mobile-friendly website. Simply bookmark