Building Blockchain Network From Scratch Using Hyperledger - Part 2 [Tutorial]
In our last post, we discussed the basics of Hyperledger and installed pre-requisites, tools and fabric runtime. This blog is aimed at giving deeper insights on how we can create and deploy the business network. Let's have a quick recap of important packages we installed earlier - yo and generator-hyperledger-composer. A generator ecosystem is provided by yo and the generator plugins can be used to set up boilerplate sample applications. The generator-hyperledger-composer is one of the yo generators that contains the specs to generate boilerplate business networks.
1. Generating a Business Network
Type yo hyperledger-composer in the terminal in a directory where you plan to create your business network.You will be prompted to select the type of project and then select the Business Network and give it an appropriate name.
2. Modeling our Business Network
Now, since the network is created the next step to identify the resources at hand. The modeling language gives four resource types.- Assets
- Participants
- Transactions
- Events
Next, we open the generated files in the code editor and open the modeling file which is org.example.biznet.cto. Save the namespace declaration and delete all that is in that file as we will have to rewrite the code with our custom requirements.
This file will contain the asset specification, in our case it is TradingCard. Further, all assets and participants have to be identified uniquely with an identifier which should be specified in the code. We set it as cardID.
Then we define enumerators to specify a type which can have N possible values. For instance, the cardType can have the values of A, B, C, D & E.
Next is to specify the trader participant resource type and the below code should help in the modeling file.
The code defines that there is a participant type Trader which is uniquely identified by TraderID. Next, add a reference to the TradingCards so as to uniquely define which card belongs to whom. This can be done by adding a Trader Owner in the code as below.
The symbol “-->” defines a relationship pointer differentiating between resource’s own properties to the relationship with another resource type.
Finally, the below code must be entered in the modeling file which specified the parameters required to make the transaction and emitting an event.
3. Adding Logic for Transactions
A Javascript file will be needed to add the logic for the TradeCard function. Get started by creating a new directory named lib in the project folder and create a new file naming it logic.jsThe decorator comments in the above code must not be ignored, for instance, the @param {org.example.biznet.TradingCard} trade gives the function a reference to the transaction, the code refers to from the modeling language. The thing to note here is the parameter name to be given at the end is the one that is passing along the function call.
The code validates for a specified card is the forTrade == true and update the card’s owner in case of positive feedback and then carry on with running TradeNotification event for the card.
4. Defining Permissions and Access Rules
The rule permissions.acl gives participants access to their resources. The rules can be stricter with production instance.5. Generating a Business Network Archive (BNA)
Once the coding is finished it is advisable to archive the business network and make it ready to be deployed on the local Fabric runtime.This can be carried out by Typing the below code in the terminal session of the project directory
composer archive create --sourceType dir --sourceName.
This command directs Hyperledger Composer to build a BNA from our current root folder.
6. Install and Deploy the BNA file
Next, use the PeerAdmin user to install and deploy the network to the local Fabric runtime. Further, Business network can be installed by running below commandcomposer network install --archiveFile cards-trading-network@0.0.1.bna --card PeerAdmin@hlfv1
To deploy the business network, type
composer network start --networkName cards-trading-network --networkVersion 0.0.1 --networkAdmin admin --networkAdminEnrollSecret adminpw --card PeerAdmin@hlfv1 --file cards-trading-admin.card
Be sure to use the same networkName and networkVersion as specified in package.json to make it work correctly.
The running status of network can then be confirmed by typing
composer network ping --card admin@cards-trading-network
--card this time takes the admin card of the network we want to ping.
For correct deployment, something similar to below screenshot must be visible.
Testing the Business Network
Now that the network is running it can start interacting with Composer Playground. This can be achieved by running command composer-playground and opening up localhost -http://localhost:8080/ in the browser.Pressing “Connect Now” for admin@cards-trading-network will take you to below screen.
This page gives you a platform to make changes to the code and deploy them when needed to upgrade the network and export network archives.
Browsing to test page will take you to below screenshot.
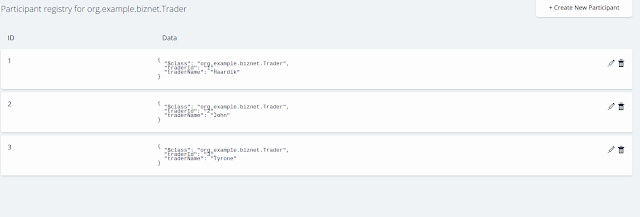
Selecting the Trader from participants gives the ability to create new participant.
Once finished setting up traders, we will move to assets, since ours is Trading Card, we select it from menu and create new ones and assign owners to each.
This marks the end of this session and in the next post, we will talk about the REST API server and how to create an Angular application that users REST API server.


 TechQuark is a mobile-friendly website. Simply bookmark